Hello avilang


  • 首页

  • 归档

javaScript 设计模式系列之四:组合模式

发表于 2017-10-19

介绍

组合模式(Composite Pattern):组合多个对象形成树形结构以表示具有“整体—部分”关系的层次结构。组合模式对单个对象(即叶子对象)和组合对象(即容器对象)的使用具有一致性,组合模式又可以称为“整体—部分”(Part-Whole)模式,它是一种对象结构型模式。
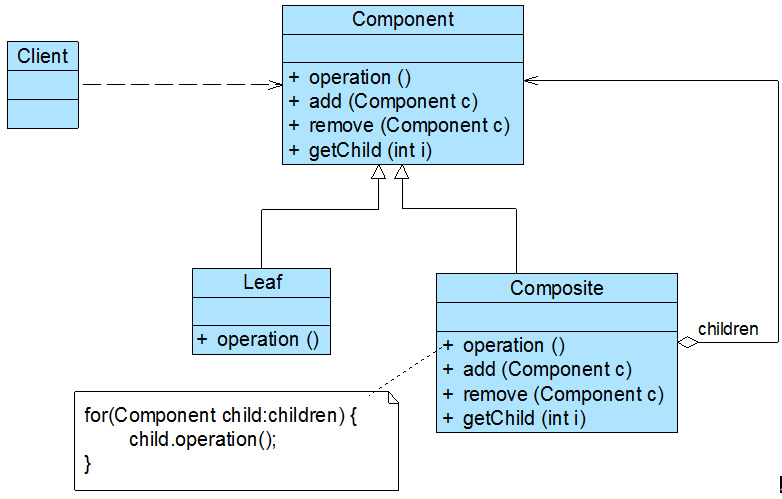
在组合模式结构图中包含如下几个角色:

  • Component(抽象构件):它可以是接口或抽象类,为叶子构件和容器构件对象声明接口,在该角色中可以包含所有子类共有行为的声明和实现。在抽象构件中定义了访问及管理它的子构件的方法,如增加子构件、删除子构件、获取子构件等。
  • Leaf(叶子构件):它在组合结构中表示叶子节点对象,叶子节点没有子节点,它实现了在抽象构件中定义的行为。对于那些访问及管理子构件的方法,可以通过异常等方式进行处理。
  • Composite(容器构件):它在组合结构中表示容器节点对象,容器节点包含子节点,其子节点可以是叶子节点,也可以是容器节点,它提供一个集合用于存储子节点,实现了在抽象构件中定义的行为,包括那些访问及管理子构件的方法,在其业务方法中可以递归调用其子节点的业务方法。

例子:餐厅菜单的应用

1
2
3
4
5
6
7
8
9
10
11
12
13
14
15
16
17
18
19
20
21
22
23
24
25
26
27
// "抽象构件"
var MenuComponent = function(){
};
MenuComponent.prototype.getName = function(){
throw new Error("This method must be overwritten!");
};
MenuComponent.prototype.getDescription = function(){
throw new Error("This method must be overwritten!");
};
MenuComponent.prototype.getPrice = function(){
throw new Error("This method must be overwritten!");
};
MenuComponent.prototype.isVegetarian = function(){
throw new Error("This method must be overwritten!");
};
MenuComponent.prototype.print = function(){
throw new Error("This method must be overwritten!");
};
MenuComponent.prototype.add = function(){
throw new Error("This method must be overwritten!");
};
MenuComponent.prototype.remove = function(){
throw new Error("This method must be overwritten!");
};
MenuComponent.prototype.getChild = function(){
throw new Error("This method must be overwritten!");
};
1
2
3
4
5
6
7
8
9
10
11
12
13
14
15
16
17
18
19
20
21
22
23
24
// "叶子构件"
var MenuItem = function(sName, sDescription, bVegetarian, nPrice){
MenuComponent.apply(this);
this.sName = sName;
this.sDescription = sDescription;
this.bVegetarian = bVegetarian;
this.nPrice = nPrice;
};
MenuItem.prototype = new MenuComponent();
MenuItem.prototype.getName = function(){
return this.sName;
};
MenuItem.prototype.getDescription = function(){
return this.sDescription;
};
MenuItem.prototype.getPrice = function(){
return this.nPrice;
};
MenuItem.prototype.isVegetarian = function(){
return this.bVegetarian;
};
MenuItem.prototype.print = function(){
console.log(this.getName() + ": " + this.getDescription() + ", " + this.getPrice() + "euros");
};
1
2
3
4
5
6
7
8
9
10
11
12
13
14
15
16
17
18
19
20
21
22
23
24
25
26
27
28
29
30
31
32
33
34
35
36
37
38
39
40
41
42
43
44
45
46
47
48
49
50
51
52
// "容器构件"
var Menu = function(sName, sDescription){
MenuComponent.apply(this);
this.aMenuComponents = [];
this.sName = sName;
this.sDescription = sDescription;
this.createIterator = function(){
throw new Error("This method must be overwritten!");
};
};
Menu.prototype = new MenuComponent();
Menu.prototype.add = function(oMenuComponent){
this.aMenuComponents.push(oMenuComponent);
};
Menu.prototype.remove = function(oMenuComponent){
var aMenuItems = [];
var nMenuItem = 0;
var nLenMenuItems = this.aMenuComponents.length;
var oItem = null;

for(; nMenuItem < nLenMenuItems;){
oItem = this.aMenuComponents[nMenuItem];
if(oItem !== oMenuComponent){
aMenuItems.push(oItem);
}
nMenuItem = nMenuItem + 1;
}
this.aMenuComponents = aMenuItems;
};
Menu.prototype.getChild = function(nIndex){
return this.aMenuComponents[nIndex];
};
Menu.prototype.getName = function(){
return this.sName;
};
Menu.prototype.getDescription = function(){
return this.sDescription;
};
Menu.prototype.print = function(){
console.log(this.getName() + ": " + this.getDescription());
console.log("--------------------------------------------");

var nMenuComponent = 0;
var nLenMenuComponents = this.aMenuComponents.length;
var oMenuComponent = null;

for(; nMenuComponent < nLenMenuComponents;){
oMenuComponent = this.aMenuComponents[nMenuComponent];
oMenuComponent.print();
nMenuComponent = nMenuComponent + 1;
}
};
1
2
3
4
5
6
7
8
9
10
11
12
13
14
15
// "指定具体容器"
var DinnerMenu = function(){
Menu.apply(this);
};
DinnerMenu.prototype = new Menu();

var CafeMenu = function(){
Menu.apply(this);
};
CafeMenu.prototype = new Menu();

var PancakeHouseMenu = function(){
Menu.apply(this);
};
PancakeHouseMenu.prototype = new Menu();
1
2
3
4
5
6
7
// "顶级容器"
var Mattress = function(aMenus){
this.aMenus = aMenus;
};
Mattress.prototype.printMenu = function(){
this.aMenus.print();
};
1
2
3
4
5
6
7
8
9
10
11
12
13
14
// 调用
var oPanCakeHouseMenu = new Menu("Pancake House Menu", "Breakfast");
var oDinnerMenu = new Menu("Dinner Menu", "Lunch");
var oCoffeeMenu = new Menu("Cafe Menu", "Dinner");
var oAllMenus = new Menu("ALL MENUS", "All menus combined");
oAllMenus.add(oPanCakeHouseMenu);
oAllMenus.add(oDinnerMenu);
oDinnerMenu.add(new MenuItem("Pasta", "Spaghetti with Marinara Sauce, and a slice of sourdough bread", true, 3.89));
oDinnerMenu.add(oCoffeeMenu);
oCoffeeMenu.add(new MenuItem("Express", "Coffee from machine", false, 0.99));
var oMattress = new Mattress(oAllMenus);
console.log("---------------------------------------------");
oMattress.printMenu();
console.log("---------------------------------------------");

相关阅读

Design-Patterns-in-Javascript-Composite
树形结构的处理——组合模式

javaScript 设计模式系列之三:代理模式

发表于 2017-09-01

介绍

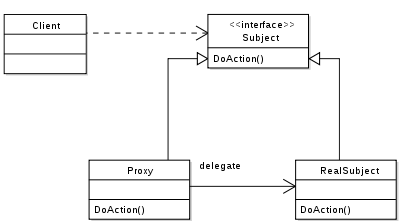
代理模式为其他对象提供一种代理以控制对这个对象的访问。

根据代理模式的使用目的不同,代理模式又可以分为多种类型

  • 远程代理 (Remote Proxy)
  • 虚拟代理 (Virtual Proxy) 如需要创建一个资源消耗较大的对象,先创建一个消耗相对较小的对象来表示,真实对象只在需要时才会被真正创建。
  • 保护代理 (Protect Proxy) 用来控制真实对象访问的权限。
  • 缓冲代理 (Cache Proxy) 为某一个目标操作的结果提供临时的存储空间,以便多个客户端可以共享这些结果。
  • 智能引用代理(Smart Reference Proxy)当一个对象被引用时,提供一些额外的操作,例如将对象被调用的次数记录下来等。

虚拟代理示例

1
2
3
4
5
6
7
8
9
10
11
12
13
14
15
16
17
18
19
20
21
22
23
24
25
26
27
28
29
30
31
32
33
34
35
36
37
38
39
40
41
42
43
44
45
46
47
48
49
/**
* DynamicProxy abstract class.
*/
function DynamicProxy() {
this.args = arguments;
this.initialized = false;

if(typeof this.class != 'function') {
throw new Error('DynamicProxy: the class attribute must be set before calling the super-class constructor.');
}

// Create the methods needed to implement the same interface.
for(var key in this.class.prototype) {
// Ensure that the property is a function
if(typeof this.class.prototype[key] !== 'function') {
continue;
}

// Add the method.
var that = this;
(function(methodName) {
that[methodName] = function() {
if(!that.initialized) {
return;
}
return that.subject[methodName].apply(that.subject, arguments);
};
})(key);
}
};

DynamicProxy.prototype = {
constructor: DynamicProxy,
_initialize: function() {
this.subject = {}; // Instantiate the class.
this.class.apply(this.subject, this.args);
this.subject.__proto__ = this.class.prototype;

this.initialized = true;
}
};

DynamicProxy.extend = function(subclass, superclass) {
for(var key in superclass.prototype) {
if(key !== 'constructor')
subclass.prototype[key] = superclass.prototype[key];
}
subclass.superclass = superclass;
};
1
2
3
4
5
6
7
8
9
10
11
12
13
14
15
16
17
18
19
20
21
22
23
24
/**
* TestProxy class.
*/
function TestProxy() {
this.class = TestClass;
TestProxy.superclass.apply(this, arguments);
};
DynamicProxy.extend(TestProxy, DynamicProxy);

/**
* Test class.
*
* @param {string} name
*/
function TestClass(name) {
this.name = name || '';
}

TestClass.prototype.getName = function() {
return this.name;
};
TestClass.prototype.setName = function(name) {
this.name = name;
}
1
2
3
4
5
6
var test = new TestProxy('Tom');
console.log(test.getName()); // undefined
test._initialize();
console.log(test.getName()); // Tom
test.setName('Mary');
console.log(test.getName()); // Mary

相关阅读

史上最全设计模式导学目录(完整版)

javaScript 设计模式系列之二:适配器模式

发表于 2017-06-08

介绍

适配器模式将一个类的接口转接成用户所期待的,有助于避免大规模改写现有客户代码。

In software engineering, the adapter pattern is a software design pattern that allows the interface of an existing class to be used from another interface. It is often used to make existing classes work with others without modifying their source code.

例:电源转换器,我们国家的电器使用普通的扁平两项或三项插头,而去外国的话,使用的标准就不一样了,比如德国,使用的是德国标准,是两项圆头的插头。如果去德国旅游,那么我们使用的手机充电器插头无法插到德国的插排中去,那就意味着我们无法给手机充电。怎样解决这个问题呢?只要使用一个电源转化器就行了。

例子:购物车

Shopping Cart Example with Local Storage

1
2
3
4
5
6
7
8
9
10
11
12
13
14
15
16
17
18
19
20
21
22
23
function ShoppingCart() {}

ShoppingCart.prototype.add = function(item) {
var items = localStorage.getItem('cart');
if (items) {
items = JSON.parse(items);

if (items[item.id]) {
items[item.id].quantity += 1;
} else {
item.quantity = 1;
items[item.id] = item;
}
} else {
items = {};
item.quantity = 1;
items[item.id] = item;
}

items = JSON.stringify(items);
localStorage.setItem('cart', items);
return item;
};
1
2
3
4
var cart = new ShoppingCart();
cart.add({ id: 1, product: 'movie 1' }); // quantity is 1 for product 1
cart.add({ id: 2, product: 'movie 2' }); // quantity is 1 for product 2
cart.add({ id: 1, product: 'movie 1' }); // quantity is 2 for product 1

上面代码中通过 localStorage 存储购物车的数据。若此时改变需求,需要通过服务器端存储,这时你不得不改变现有的代码,此时更好的实现方式时引入”适配器”。

Shopping Cart Example with Adapters

1
2
3
4
5
6
7
8
9
10
11
12
13
14
15
16
17
18
19
20
21
22
23
//  jQuery deferreds and promises
var localStorageAdapter = {
findAll: function() {
var deferred = new $.Deferred();
var items = localStorage.getItem('cart');

if (items) {
items = JSON.parse(items);
}

deferred.resolve(items);
return deferred.promise();
},

save: function(items) {
var deferred = new $.Deferred();

items = JSON.stringify(items);
localStorage.setItem('cart', items);
deferred.resolve();
return deferred.promise();
}
};
1
2
3
4
5
6
7
8
9
10
11
12
13
14
15
16
17
18
19
20
//  jQuery deferreds and promises.
var serverSideAdapter = {
findAll: function() {
return $.ajax({
url: '/shopping-cart'
}).then(function(response) {
return response.items;
});
},

save: function(items) {
return $.ajax({
url: '/shopping-cart',
type: 'post',
data: {
items: items
}
});
}
};
1
2
3
4
5
6
7
8
9
10
11
12
13
14
15
16
17
18
19
20
21
22
23
24
25
26
27
28
29
function ShoppingCart(adapter) {
this.adapter = adapter;
}

ShoppingCart.prototype.add = function(item) {
var adapter = this.adapter;
var deferred = new $.Deferred();

adapter.findAll().then(function(items) {
if (items) {
if (items[item.id]) {
items[item.id].quantity += 1;
} else {
item.quantity = 1;
items[item.id] = item;
}
} else {
items = {};
item.quantity = 1;
items[item.id] = item;
}

adapter.save(items).then(function() {
deferred.resolve(item);
});
});

return deferred.promise();
};
1
2
3
4
5
6
7
8
// localStorageAdapter
var cart = new ShoppingCart(localStorageAdapter);
cart.add({ id: 1, product: 'movie 1' }).then(function(item) { }); // quantity is 1 for product 1
cart.add({ id: 2, product: 'movie 2' }).then(function(item) { }); // quantity is 1 for product 2
cart.add({ id: 1, product: 'movie 1' }).then(function(item) { }); // quantity is 2 for product 1

// serverSideAdapter
var cart = new ShoppingCart(serverSideAdapter);

例子:日志记录

1
2
3
4
5
6
7
8
9
10
11
12
13
14
15
16
17
18
19
20
21
22
23
24
25
26
27
28
29
30
31
// 当前 logger 
function BadLogger(name) {
this.name = name;
var LOG_HEADER = '[' + name + ']:';
var self = this;

return {
getName: function getName() {
return self.name;
},
getType: function getType() {
return 'BadLogger';
},
information: function information(message) {
console.info(LOG_HEADER + message + '- INFORMATION' );
},
debg: function debg(message) {
console.log(LOG_HEADER + message + '- DEBG');
},
w: function w(message) { // w stands for warning.
console.warn(LOG_HEADER + message + '- W' );
},
err: function err(message) {
console.error(LOG_HEADER + message+ '- ERR' );
}
}
}

module.exports = {
getLogger: BadLogger
}
1
2
3
4
5
6
7
8
9
10
11
12
13
14
15
16
17
18
19
20
21
22
23
24
25
26
27
28
29
30
31
32
33
// 另一个 logger
function ShortLogger(name) {
this.name = name;
var LOG_HEADER = '[' + name + ']';
var self = this;
var getTime = function() {
return '[' + new Date().toISOString() + ']';
}
return {
getName: function getName() {
return self.name;
},
getType: function getType() {
return 'ShortLogger';
},
i: function i(message) {
console.info(LOG_HEADER + getTime() + '[I]: ' + message);
},
d: function d(message) {
console.log(LOG_HEADER + getTime() + '[D]: ' + message);
},
w: function w(message) {
console.warn(LOG_HEADER + getTime() + '[W]: ' + message);
},
e: function e(message) {
console.error(LOG_HEADER + getTime() + '[E]: ' + message);
}
}
}

module.exports = {
getLogger: ShortLogger
}
1
2
3
4
5
6
7
8
9
10
11
12
13
14
15
16
17
18
19
20
21
22
23
24
25
26
27
28
29
30
31
32
33
34
35
36
37
38
39
40
41
42
43
44
45
46
47
48
49
50
51
52
53
54
55
56
57
58
59
60
var ShortLogger = require('./ShortLogger');  
var BadLogger = require('./BadLogger');

function LoggerAdapter(loggerObj) {
if (!loggerObj) {
throw Error('Parameter [loggerObj] is not defined.');
}
console.log('[LoggerAdapter] is using Logger with name: ' + loggerObj.getName());
var CONSTANTS = {
DEBUG: 'DEBUG',
WARNING: 'WARNING',
INFORMATION: 'INFORMATION',
ERROR: 'ERROR',
BAD_LOGGER: 'BadLogger',
SHORT_LOGGER: 'ShortLogger'
};
var loggerFunctionMapper = {};

if(loggerObj.getType() === CONSTANTS.BAD_LOGGER) {
loggerFunctionMapper[CONSTANTS.DEBUG] = loggerObj.debg;
loggerFunctionMapper[CONSTANTS.INFORMATION] = loggerObj.information;
loggerFunctionMapper[CONSTANTS.WARNING] = loggerObj.w;
loggerFunctionMapper[CONSTANTS.ERROR] = loggerObj.err;
}
else if (loggerObj.getType() === CONSTANTS.SHORT_LOGGER) {
loggerFunctionMapper[CONSTANTS.DEBUG] = loggerObj.d;
loggerFunctionMapper[CONSTANTS.INFORMATION] = loggerObj.i;
loggerFunctionMapper[CONSTANTS.WARNING] = loggerObj.w;
loggerFunctionMapper[CONSTANTS.ERROR] = loggerObj.e;
}

function information(message) {
try {
loggerFunctionMapper[CONSTANTS.INFORMATION](message);
}
catch(err) {
throw Error('No implementation for Logger: ' + loggerObj.toString());
}
};

function debug(message) {
try {
loggerFunctionMapper[CONSTANTS.DEBUG](message);
}
catch(err) {
throw Error('No implementation for Logger: ' + loggerObj.toString());
}
};
...
return {
debug: debug,
information: information,
warning: warning,
error: error
}
}

module.exports = {
LoggerAdapter: LoggerAdapter
}
1
2
3
4
5
6
7
8
9
10
11
12
13
14
15
16
17
18
19
var ShortLogger = require('./ShortLogger');  
var BadLogger = require('./BadLogger');
var LoggerAdapter = require('./LoggerAdapter');
var shortLog = ShortLogger.getLogger('ShortLoger');
var badLogger = BadLogger.getLogger('BadLogger');

var loggerAdapter = LoggerAdapter.LoggerAdapter(badLogger);
loggerAdapter.information('This is logged through LoggerAdapter');
loggerAdapter.debug('This is logged through LoggerAdapter');
loggerAdapter.warning('This is logged through LoggerAdapter');
loggerAdapter.error('This is logged through LoggerAdapter');

console.log();

var loggerAdapter2 = LoggerAdapter.LoggerAdapter(shortLog);
loggerAdapter2.information('Now This is logged through LoggerAdapter');
loggerAdapter2.debug('Now This is logged through LoggerAdapter');
loggerAdapter2.warning('Now This is logged through LoggerAdapter');
loggerAdapter2.error('Now This is logged through LoggerAdapter');

相关阅读

The Adapter Pattern in JavaScript
Design Patterns - The Adapter Pattern in JavaScript

javaScript 设计模式系列之一:观察者模式

发表于 2017-05-20

介绍

观察者模式又叫发布订阅模式(Publish/Subscribe),一个目标对象管理所有相依于它的观察者对象。该模式中存在两个角色:观察者和被观察者。目标对象与观察者之间的抽象耦合关系能够单独扩展以及重用。

该模式通常有两种实现策略:”推”(push) 和 “拉”(pull)

例:对于报社可能雇佣投送人员四处送报给订阅者,这就是主动推送。而对于规模小的报社没有足够的资源去雇佣投送员,这时候可以采取 “拉” 的方式。就是在订阅者附近提供自己的数据,供订阅者 “拉” 自己所需的数据。

实现

push

1
2
3
4
5
6
7
8
9
10
11
12
13
14
15
16
17
18
19
20
21
22
23
24
25
26
27
28
29
30
31
32
33
34
35
36
37
38
39
40
41
42
var Observable = {
observers: []
, lastId: -1
, addObserver: function(observer) {
this.observers.push({
callback: observer
, id: ++this.lastId
})

return this.lastId
}
, removeObserver: function(id) {
for (var i = this.observers.length - 1; i >= 0; i--) {
this.observers[i]
if (this.observers[i].id == id) {
this.observers.splice(i, 1)
return true
}
}

return false
}
, notifyObservers: function(message) {
for (var i = this.observers.length - 1; i >= 0; i--) {
this.observers[i].callback(message)
};
}
}

var id_1 = Observable.addObserver(function(message){
console.log("First observer message:" + message)
})

var observer = function(message){
console.log("Second observer message:" + message)
}

var id_2 = Observable.addObserver(observer)

Observable.notifyObservers('test 1')
Observable.removeObserver(id_2)
Observable.notifyObservers('test 2')

pull

1
2
3
4
5
6
7
8
9
10
11
12
13
14
15
16
17
18
19
20
21
22
23
24
25
26
27
28
29
30
31
32
33
34
35
36
37
38
39
40
41
42
43
44
45
46
47
48
49
var Observable = {}

;(function(O){
var observers = []
, privateVar

O.addObserver = function(observer) {
observers.push(observer)
}

O.removeObserver = function(observer) {
var index = observers.indexOf(observer)

if (~index) {
observers.splice(index, 1)
}
}

O.notifyObservers = function() {
for (var i = observers.length - 1; i >= 0; i--) {
observers[i].update()
};
}

O.updatePrivate = function(newValue) {
privateVar = newValue
this.notifyObservers()
}

O.getPrivate = function() {
return privateVar
}
}(Observable))

Observable.addObserver({
update: function(){
this.process()
}
, process: function(){
var value = Observable.getPrivate()
console.log("Private value is: " + value)
}
})

Observable.updatePrivate('test 1')
// Private value is: test 1

Observable.updatePrivate('test 2')
// Private value is: test 2

被观察对象将通知所有的观察者,并且每个观察者将从被观察对象中提取所需的信息。

让多个对象都具有观察者发布订阅的功能

1
2
3
4
5
6
7
8
9
10
11
12
13
14
15
16
17
18
19
20
21
22
23
24
25
26
27
28
29
30
31
32
33
34
35
36
37
38
39
40
41
42
43
44
45
46
47
48
49
50
51
52
53
54
55
56
57
58
59
60
var observer = {
addSubscriber:function (callback) {
this.subscribers[this.subscribers.length] = callback;
},
removeSubscriber:function (callback) {
for (var i = 0; i < this.subscribers.length; i++) {
if (this.subscribers[i] === callback) {
delete(this.subscribers[i]);
}
}
},
publish:function (what) {
for (var i = 0; i < this.subscribers.length; i++) {
if (typeof this.subscribers[i] === 'function') {
this.subscribers[i](what);
}
}
},
make:function (o) { // turns an object into a publisher
for (var i in this) {
o[i] = this[i];
o.subscribers = [];
}
}
};

var blogger = {
writeBlogPost:function () {
var content = 'Today is ' + new Date();
this.publish(content);
}
};
var la_times = {
newIssue:function () {
var paper = 'Martians have landed on Earth!';
this.publish(paper);
}
};

observer.make(blogger);
observer.make(la_times);

var jack = {
read:function (what) {
console.log('I just read that ' + what)
}
};
var jill = {
gossip:function (what) {
console.log('You didn\'t hear it from me, but ' + what)
}
};

blogger.addSubscriber(jack.read);
blogger.addSubscriber(jill.gossip);
blogger.writeBlogPost();
blogger.removeSubscriber(jill.gossip);
blogger.writeBlogPost();
la_times.addSubscriber(jill.gossip);
la_times.newIssue();

避免创建多个被观察者对象,可以增加 “命名空间”

1
2
3
4
5
6
7
8
9
10
11
12
13
14
15
16
17
18
19
20
21
22
23
24
25
26
27
28
29
30
31
32
33
34
35
36
37
38
39
40
var Observable = {
observers: []
, addObserver: function(topic, observer) {
this.observers[topic] || (this.observers[topic] = [])

this.observers[topic].push(observer)
}
, removeObserver: function(topic, observer) {
if (!this.observers[topic])
return;

var index = this.observers[topic].indexOf(observer)

if (~index) {
this.observers[topic].splice(index, 1)
}
}
, notifyObservers: function(topic, message) {
if (!this.observers[topic])
return;

for (var i = this.observers[topic].length - 1; i >= 0; i--) {
this.observers[topic][i](message)
};
}
}

Observable.addObserver('cart', function(message){
console.log("First observer message:" + message)
})

Observable.addObserver('notificatons', function(message){
console.log("Second observer message:" + message)
})

Observable.notifyObservers('cart', 'test 1')
// First observer message:test 1

Observable.notifyObservers('notificatons', 'test 2')
// Second observer message:test 2

相关阅读

javascript-observer-publish-subscribe-pattern
深入理解JavaScript系列(32):设计模式之观察者模式
javascript-patterns-observer

聊聊 S.O.L.I.D 五大原则

发表于 2017-04-22

前言

今天聊聊在面向对象编程中的五个基本原则,适当的利用这些原则,让代码变得可维护和扩展。本文以 javascript 语言为例,可能以这门语言来讨论 S.O.L.I.D 五大原则有点不伦不类,但其中的思想是很必要去学习和理解的。

单一职责(Single Responsibility Principle)

单一职责的描述如下:

A class should have only one reason to change
类发生更改的原因应该只有一个

遵守单一职责的好处是可以让我们很容易地来维护这个对象,当一个对象封装了很多职责的话,一旦一个职责需要修改,势必会影响该对象想的其它职责代码。通过解耦可以让每个职责工更加有弹性地变化。

相关阅读:深入理解JavaScript系列(6):S.O.L.I.D五大原则之单一职责SRP

开闭原则(Open/Closed Principle)

开闭原则的描述如下:

Software entities (classes, modules, functions, etc.) should be open for extension but closed for modification.
软件实体(类,模块,方法等等)应当对扩展开放,对修改关闭,即软件实体应当在不修改的前提下扩展。

为了直观地描述,下面给出一个动态展示问题列表的代码作为演示(不符合开闭原则)

1
2
3
4
5
6
7
8
9
10
11
12
13
14
15
16
17
18
19
20
21
22
23
24
25
26
27
28
29
30
31
32
33
34
35
36
37
38
39
40
41
42
43
44
45
46
47
48
49
50
51
52
53
54
55
56
57
58
59
60
61
62
63
64
65
66
67
68
// 问题类型
var AnswerType = {
Choice: 0,
Input: 1
};

// 问题实体
function question(label, answerType, choices) {
return {
label: label,
answerType: answerType,
choices: choices // 是可选参数
};
}

var view = (function () {
// render
function renderQuestion(target, question) {
var questionWrapper = document.createElement('div');
questionWrapper.className = 'question';

var questionLabel = document.createElement('div');
questionLabel.className = 'question-label';
var label = document.createTextNode(question.label);
questionLabel.appendChild(label);

var answer = document.createElement('div');
answer.className = 'question-input';

// 根据不同的类型展示不同的代码:分别是下拉菜单和输入框两种
if (question.answerType === AnswerType.Choice) {
var input = document.createElement('select');
var len = question.choices.length;
for (var i = 0; i < len; i++) {
var option = document.createElement('option');
option.text = question.choices[i];
option.value = question.choices[i];
input.appendChild(option);
}
}
else if (question.answerType === AnswerType.Input) {
var input = document.createElement('input');
input.type = 'text';
}

answer.appendChild(input);
questionWrapper.appendChild(questionLabel);
questionWrapper.appendChild(answer);
target.appendChild(questionWrapper);
}

return {
// 遍历所有的问题列表进行渲染
render: function (target, questions) {
for (var i = 0; i < questions.length; i++) {
renderQuestion(target, questions[i]);
};
}
};
})();

var questions = [
question('Have you used tobacco products within the last 30 days?',AnswerType.Choice, ['Yes', 'No']),
question('What medications are you currently using?', AnswerType.Input)
];

var questionRegion = document.getElementById('questions');
view.render(questionRegion, questions);

上面代码有一个限制,就是如果再增加一个问题类型的话,那就需要再次修改renderQuestion里的条件语句,这明显违反了开闭原则。重构后的代码如下:(符合开闭原则)

1
2
3
4
5
6
7
8
9
10
11
12
13
14
15
16
17
18
19
20
21
22
23
24
25
26
27
28
29
30
31
32
33
34
35
36
37
38
39
40
41
42
43
44
45
46
47
48
49
50
51
52
53
54
55
56
57
58
59
60
61
62
63
64
65
66
67
68
69
70
71
72
73
74
75
76
77
78
79
80
81
82
83
84
function questionCreator(spec, my) {
var that = {};

my = my || {};
my.label = spec.label;

my.renderInput = function() {
throw "not implemented";
};

that.render = function(target) {
var questionWrapper = document.createElement('div');
questionWrapper.className = 'question';

var questionLabel = document.createElement('div');
questionLabel.className = 'question-label';
var label = document.createTextNode(spec.label);
questionLabel.appendChild(label);

var answer = my.renderInput();

questionWrapper.appendChild(questionLabel);
questionWrapper.appendChild(answer);
return questionWrapper;
};

return that;
}

function choiceQuestionCreator(spec) {

var my = {},
that = questionCreator(spec, my);

my.renderInput = function() {
var input = document.createElement('select');
var len = spec.choices.length;
for (var i = 0; i < len; i++) {
var option = document.createElement('option');
option.text = spec.choices[i];
option.value = spec.choices[i];
input.appendChild(option);
}

return input;
};

return that;
}

function inputQuestionCreator(spec) {

var my = {},
that = questionCreator(spec, my);

my.renderInput = function() {
var input = document.createElement('input');
input.type = 'text';
return input;
};

return that;
}

var view = {
render: function(target, questions) {
for (var i = 0; i < questions.length; i++) {
target.appendChild(questions[i].render());
}
}
};

var questions = [
choiceQuestionCreator({
label: 'Have you used tobacco products within the last 30 days?',
choices: ['Yes', 'No']
}),
inputQuestionCreator({
label: 'What medications are you currently using?'
})
];

var questionRegion = document.getElementById('questions');
view.render(questionRegion, questions);

重构后的代码可以很容易的地进行扩展了,从而达到了开闭原则的要求。

相关阅读:深入理解JavaScript系列(7):S.O.L.I.D五大原则之开闭原则OCP

里氏替换原则(Liskov Substitution Principle)

里氏替换原则的描述如下:

Subtypes must be substitutable for their base types.
派生类型必须可以替换它的基类型

正方形和矩形

1
2
3
4
5
6
7
8
9
10
11
12
13
14
15
16
17
18
19
20
21
22
23
24
25
26
27
28
29
30
// 矩形对象
var rectangle = {
length: 0,
width: 0
};

// 正方形(宽高一致)
var square = {};
(function() {
var length = 0, width = 0;
Object.defineProperty(square, "length", {
get: function() { return length; },
set: function(value) { length = width = value; }
});
Object.defineProperty(square, "width", {
get: function() { return width; },
set: function(value) { length = width = value; }
});
})();

var g = function(rectangle) {
rectangle.length = 3;
rectangle.width = 4;
console.log(rectangle.length);
console.log(rectangle.width);
console.log(rectangle.length * rectangle.width);
};

// 正方形代替矩形
g(square);

当我们使用正方形代替矩形执行代码的时,会发现得到的结果并不是我们所期待的结果,这明显违法了里氏替换原则。

鸵鸟到底是不是鸟?

一讲到鸟,就认为它能飞,有的鸟确实能飞,但不是所有的鸟都能飞。问题就是出在这里。如果以“飞”的行为作为衡量“鸟”的标准的话,鸵鸟显然不是鸟。如果按照生物学的划分标准:有翅膀、有羽毛等特性作为衡量“鸟”的标准的话,鸵鸟理所当然就是鸟了。鸵鸟没有“飞”的行为,我们强行给它加上了这个行为,所以在面对“飞越太平洋”的需求时,代码就会出现运行期故障,故设计要依赖于用户要求和具体环境而定。

相关阅读

深入理解JavaScript系列(8):S.O.L.I.D五大原则之里氏替换原则LSP
架构师之路之里氏代换原则

接口隔离原则(Interface Segregation Principle)

接口隔离原则的描述如下:

Clients should not be forced to depend on methods they do not use.
不应该强迫客户依赖于它们不用的方法

目前为止(2017-04-22),JavaScript 没有接口的特性,不像 Java 等一些语言原生就提供接口的特性。当然 JavaScript 也有自己的一些实现,有兴趣的读者可参阅《JavaScript设计模式》一书(作者:Ross Harmes),其中有探讨在 JavaScript 中模仿接口的实现。

相关阅读:深入理解JavaScript系列(21):S.O.L.I.D五大原则之接口隔离原则ISP

依赖倒置原则(Dependency Inversion Principle)

依赖倒置原则的描述如下:

A. High-level modules should not depend on low-level modules. Both should depend on abstractions.
高层模块不应该依赖于低层模块,二者都应该依赖于抽象

B. Abstractions should not depend upon details. Details should depend upon abstractions.
抽象不应该依赖于细节,细节应该依赖于抽象

依赖倒置原则的最重要问题就是确保应用程序或框架的主要组件从非重要的底层组件实现细节解耦出来,这将确保程序的最重要的部分不会因为低层次组件的变化修改而受影响。下面给出一个示例:

1
2
3
4
5
6
7
8
9
10
11
12
13
14
15
16
17
18
19
20
21
22
23
24
25
26
27
28
29
30
31
32
33
34
35
36
37
38
39
40
41
42
43
44
45
46
47
48
49
$.fn.trackMap = function(options) {
var defaults = {
/* defaults */
};
options = $.extend({}, defaults, options);

var mapOptions = {
center: new google.maps.LatLng(options.latitude,options.longitude),
zoom: 12,
mapTypeId: google.maps.MapTypeId.ROADMAP
},
map = new google.maps.Map(this[0], mapOptions),
pos = new google.maps.LatLng(options.latitude,options.longitude);

var marker = new google.maps.Marker({
position: pos,
title: options.title,
icon: options.icon
});

marker.setMap(map);

options.feed.update(function(latitude, longitude) {
marker.setMap(null);
var newLatLng = new google.maps.LatLng(latitude, longitude);
marker.position = newLatLng;
marker.setMap(map);
map.setCenter(newLatLng);
});

return this;
};

var updater = (function() {
// private properties
return {
update: function(callback) {
updateMap = callback;
}
};
})();

$("#map_canvas").trackMap({
latitude: 35.044640193770725,
longitude: -89.98193264007568,
icon: 'http://bit.ly/zjnGDe',
title: 'Tracking Number: 12345',
feed: updater
});

上面代码中 trackMap 函数有2个依赖:第三方的Google Maps API和Location feed。如果需要切换不同的地图提供商的话那就不得不对trackMap函数进行重写。对此我们应该实现一个适配Google Maps API的对象。如下:

1
2
3
4
5
6
7
8
9
10
11
12
13
14
15
16
17
18
19
20
21
22
23
24
25
26
27
28
29
30
$.fn.trackMap = function(options) {
var defaults = {
/* defaults */
};

options = $.extend({}, defaults, options);

options.provider.showMap(
this[0],
options.latitude,
options.longitude,
options.icon,
options.title);

options.feed.update(function(latitude, longitude) {
options.provider.updateMap(latitude, longitude);
});

return this;
};

$("#map_canvas").trackMap({
latitude: 35.044640193770725,
longitude: -89.98193264007568,
icon: 'http://bit.ly/zjnGDe',
title: 'Tracking Number: 12345',
feed: updater,
provider: trackMap.googleMapsProvider
});
`
1
2
3
4
5
6
7
8
9
10
11
12
13
14
15
16
17
18
19
20
21
22
23
24
25
26
27
28
29
30
31
trackMap.googleMapsProvider = (function() {
var marker, map;

return {
showMap: function(element, latitude, longitude, icon, title) {
var mapOptions = {
center: new google.maps.LatLng(latitude, longitude),
zoom: 12,
mapTypeId: google.maps.MapTypeId.ROADMAP
},
pos = new google.maps.LatLng(latitude, longitude);

map = new google.maps.Map(element, mapOptions);

marker = new google.maps.Marker({
position: pos,
title: title,
icon: icon
});

marker.setMap(map);
},
updateMap: function(latitude, longitude) {
marker.setMap(null);
var newLatLng = new google.maps.LatLng(latitude,longitude);
marker.position = newLatLng;
marker.setMap(map);
map.setCenter(newLatLng);
}
};
})();

相关阅读:深入理解JavaScript系列(22):S.O.L.I.D五大原则之依赖倒置原则DIP

关于程序学习的一些感语

发表于 2017-04-21

关于本文

今天狂社区的时候,无意看到一篇关于对 javascript中异步的理解 的文章,也因此无意看到了朴灵评注阮一峰老师的JavaScript 运行机制详解:再谈Event Loop这篇文章,由此说一说自身的一个感受和给初学者一些学习的建议。

朴灵和阮一峰都是大神级人物,不清楚的读者可自行谷歌。

感受

上文中提到朴灵评注阮一峰老师的文章,然而文中提到的 javascript 运行机制、Event Loop、堆、栈 这些比较底层的知识点。对于这些知识点,不是真正的专家估计是难以说得清楚,不同的程序员和级别不同的程序员,有着不一样的理解。

比如对于程序代码在内存中是如何存放(堆、栈)来说,你想深入去学习,那么你可能就需要去了解操作系统相关的一些知识点。还有像一些程序设计模式的理解和应用,像这些知识点,很难给出一个很确切标准的答案。那么我们该如何对待这些问题?我认为应该持这样的一种态度:

  • 不要过分崇拜大牛,要带着批判的眼光阅读技术文章,对文章好坏辨识度会随着自身水平的提高而提高。
  • 一句老话“实践出真知”,学程序没有捷径,天赋不足,就得多敲

程序学习的过程本身就得不断学习,然而有一天你会发现,你以前学的或理解的是错误的或不完全正确的,由此循环下去…

简单列出几点程序学习的一些建议

  1. 不断的打基础,基础不牢很快就到瓶颈,遇到深入问题,还解决不了
  2. 有时间多读几本好书,书上的知识一般比较权威。(ps:本人一般只读国外的)
  3. 多敲代码,多思考,先把业务代码给写好了,再谈架构和设计模式这些
  4. 多狂社区,把自己的学习笔记记录下来,比如写博客
  5. 有精力的话,多学几门不同的语言
  6. 坚持学习!坚持学习!坚持学习!

相关阅读

JavaScript 运行机制详解:再谈Event Loop
【朴灵评注】JavaScript 运行机制详解:再谈Event Loop
怎么看待朴灵评注阮一峰老师的最新文章这件事?
nodejs 事件轮询详述
JavaScript 并发模型与Event Loop
JavaScript 内存管理

localStorage 相关阅读

发表于 2017-01-07

localStorage 本地存储

本文不做有关 localStorage 介绍,大家可参阅下文给出的相关文章。在此给出一个 localStorage 的工具类 lstore,具体用法和 API 可跳转查看。

相关阅读

  • 使用 localStorage 必须了解的点
  • 八一下 LocalStorage 本地存储的卦
  • HTML5本地存储 Localstorage
  • Storage
  • 静态资源(JS/CSS)存储在localStorage有什么缺点?
  • 大公司里怎样开发和部署前端代码?
  • store.js
  • 让我们再聊聊浏览器资源加载优化
  • cuzillion

javascript 随笔

发表于 2016-11-04

前言

本篇主要记录 javascript 中的一些特性,文章逻辑和排版比较随意,当然包含的内容,有很大的局限性,仅当草稿。

随笔

严格模式 (use strict)

除了正常运行模式,ECMAScript 5 添加了第二种运行模式:“严格模式”(strict mode)。顾名思义,这种模式使得 JavaScript 在更严格的条件下运行。

设立”严格模式“的目的,主要有以下几个:

  • 消除 JavaScript 语法的一些不合理、不严谨之处,减少一些怪异行为;
  • 增加更多报错的场合,消除代码运行的一些不安全之处,保证代码运行的安全;
  • 提高编译器效率,增加运行速度;
  • 为未来新版本的 JavaScript 做好铺垫;

“严格模式”体现了 JavaScript 更合理、更安全、更严谨的发展方向。更多介绍可移步阅读 阮一峰 - 严格模式

包装对象

在 JavaScript 中,”一切皆对象”,数组和函数本质上都是对象,就连三种原始类型的值:数值、字符串、布尔值在一定条件下,也会自动转为对象,也就是原始类型的”包装对象”。

所谓”包装对象”,就是分别与数值、字符串、布尔值相对应的 Number 、 String 、 Boolean 三个原生对象。这三个原生对象可以把原始类型的值变成(包装成)对象。

1
2
3
4
5
6
7
8
9
10
11
var v1 = new Number(123);
var v2 = new String("abc");
var v3 = new Boolean(true);

typeof v1 // "object"
typeof v2 // "object"
typeof v3 // "object"

v1 === 123 // false
v2 === "abc" // false
v3 === true // false
1
2
3
4
var v = new String("abc");
v.length // 3

"abc".length // 3

上面代码对字符串 abc 调用 length 属性,实际上是将字符串自动转为 String 对象的实例,再在其上调用 length 属性。这就叫原始类型的自动转换。

abc 是一个字符串,属于原始类型,本身不能调用任何方法和属性。但当对 abc 调用 length 属性时,JavaScript 引擎自动将 abc 转化为一个包装对象实例,然后再对这个实例调用 length 属性,在得到返回值后,再自动销毁这个临时生成的包装对象实例。

1
'abc'.charAt === String.prototype.charAt   // true

注意:如果直接对原始类型的变量添加属性,是无效。

1
2
3
var s = "abc";
s.p = 123;
s.p // undefined

数字类型

根据 ECMAScript 标准,JavaScript 中只有一种数字类型:基于 IEEE 754 标准的双精度 64 位二进制格式的值,它并没有为整数给出一种特定的类型。除了能够表示浮点数外,还有一些带符号的值:+Infinity,-Infinity,NaN

注意浮点数的运算中,可能会出现“舍入误差”。例如:

1
0.1 + 0.2 = 0.30000000000000004

产生这种误差的原因:

1
2
0.1 => 0.0001 1001 1001 1001…(无限循环)
0.2 => 0.0011 0011 0011 0011…(无限循环)

双精度浮点数的小数部分最多支持 52 位,所以两者相加之后得到这么一串 0.0100110011001100110011001100110011001100110011001100 因浮点数小数位的限制而截断的二进制数字,这时候,我们再把它转换为十进制,就成了 0.30000000000000004

相关阅读:http://www.chengfeilong.com/toFixed

标记语句 (labeled statement)

通常和 break 或 continue 语句一起使用。标记就是在一条语句前面加个可以引用的标识符,任何不是保留关键字的 javascript 标识符。

1
2
3
4
5
6
7
8
9
10
11
12
var i, j;

loop1:
for (i = 0; i < 3; i++) {
loop2:
for (j = 0; j < 3; j++) {
if (i == 1 && j == 1) {
continue loop1;
}
console.log("i = " + i + ", j = " + j);
}
}
1
2
3
4
5
6
7
8
9
10
11
12
var i, j;

loop1:
for (i = 0; i < 3; i++) {
loop2:
for (j = 0; j < 3; j++) {
if (i == 1 && j == 1) {
break loop1;
}
console.log("i = " + i + ", j = " + j);
}
}

可参阅 labeled statement

判断 NaN 的方法

isNaN 方法可以用来判断一个值是否为 NaN,isNaN 只对数值有效,如果传入其他值,会被先转成数值。

1
2
3
4
5
6
7
8
9
isNaN(NaN) // true
isNaN(123) // false
isNaN('Hello') // true
isNaN({}) // true
isNaN(['xzy']) // true
isNaN([]) // false
isNaN([123]) // false
isNaN([123,456]) // true
isNaN(['123']) // false

因此判断 NaN 时要注意数据类型的转换。也可以自己封装一个 isNaN 函数。

1
2
3
function myIsNaN(value) {
return typeof value === 'number' && isNaN(value);
}

利用了 NaN 不等于自身的特性

1
2
3
function myIsNaN(value) {
return value !== value;
}

注意:如果数组中包含 NaN 下面的方法不适用]

1
2
[NaN].indexOf(NaN) // -1
[NaN].lastIndexOf(NaN) // -1

这是因为这两个方法内部,使用严格相等运算符(===)进行比较,而 NaN 是唯一一个不等于自身的值。

字符处理

在 javascript 中处理字符需要注意一些特殊字符,在这里紧给出简单例子。

1
2
3
4
var s = '\ud834\udf06';
console.log(s); // 𝌆
console.log(s.length); // 2
console.log(/^.$/.test(s)); // false

特殊字符 𝌆 length 属性为 2 ,匹配单个字符的正则表达式会失败。具体原因可点击查阅

数组本质

数组属于一种特殊的对象。

1
2
var arr = ['a', 'b', 'c'];
Object.keys(arr); // ['0', '1', '2']

Object.keys 方法返回数组的所有键名。

还需要要注意数组的空位,即 [,1,,3] 这类型数组遍历的时候需要注意,利用 for ... in 结构会跳过空位。如果读取数组的空位,则返回 undefined。

空位和 undefined 是不一样的,如果数字某个位置是 undefined 遍历时不会被跳过。

1
Object.keys([,1,,3]);  // ['1', '3']

运算符

且运算符 (&&)

且运算符的运算规则是:如果第一个运算子的布尔值为true,则返回第二个运算子的值(注意是值,不是布尔值);如果第一个运算子的布尔值为false,则直接返回第一个运算子的值,且不再对第二个运算子求值。

1
2
3
4
5
6
7
8
9
"t" && "" // ""
"t" && "f" // "f"
"t" && (1+2) // 3
"" && "f" // ""
"" && "" // ""

var x = 1;
(1-1) && (x+=1) // 0
x // 1
1
2
3
4
5
6
7
if (i !== 0 ){
doSomething();
}

// 等价于

i && doSomething();
1
true && 'foo' && '' && 4 && 'foo' && true
或运算符 (||)

或运算符的运算规则是:如果第一个运算子的布尔值为true,则返回第一个运算子的值,且不再对第二个运算子求值;如果第一个运算子的布尔值为false,则返回第二个运算子的值。

你可以点击阅读有关运算符的知识,如位运算符,void 运算符的一些用法。

Math 对象

Math 对象是 JavaScript 的内置对象,提供一系列数学常数和数学方法。该对象不是构造函数,所以不能生成实例,所有的属性和方法都必须在 Math 对象上调用。

1
new Math()  // TypeError: Math is not a constructor

JSON 对象

有关 JSON 对象的详细介绍可点击阅读: http://javascript.ruanyifeng.com/stdlib/json.html 其中像 JSON.stringify() JSON.parse() 的方法有多个参数。

RegExp 对象

有关 JavaScript 的正则可点击阅读: http://javascript.ruanyifeng.com/stdlib/regexp.html

new 命令

new 命令的作用,就是执行构造函数,返回一个实例对象。一般构造函数首字母大写。注意:应该避免出现不使用 new 命令、直接调用构造函数的情况,原因如下:

1
2
3
4
5
6
7
8
var Vehicle = function (){
this.price = 1000;
};

var v = Vehicle();
v.price // TypeError: Cannot read property 'price' of undefined(…)

price // 1000

上面代码中,调用 Vehicle 构造函数时,忘了加上 new 命令。结果 price 属性变成了全局变量,而变量 v 变成了 undefined

为了保证构造函数必须与 new 命令一起使用,一个解决办法是,在构造函数内部使用严格模式,即第一行加上 use strict

1
2
3
4
5
6
7
8
function Fubar(foo, bar){
"use strict";

this._foo = foo;
this._bar = bar;
}

Fubar() // ypeError: Cannot set property '_foo' of undefined(…)

上面代码的 Fubar 为构造函数,use strict 命令保证了该函数在严格模式下运行。由于在严格模式中,函数内部的 this 不能指向全局对象,默认等于 undefined ,导致不加 new 调用会报错。( JavaScript 不允许对 undefined 添加属性)

另一个解决办法,是在构造函数内部判断是否使用 new 命令,如果发现没有使用,则直接返回一个实例对象。

1
2
3
4
5
6
7
8
9
10
11
function Fubar(foo, bar){
if (!(this instanceof Fubar)) {
return new Fubar(foo, bar);
}

this._foo = foo;
this._bar = bar;
}

Fubar(1, 2)._foo // 1
(new Fubar(1, 2))._foo // 1

上面代码中的构造函数,不管加不加 new 命令,都会得到同样的结果。
更详细可阅读 http://javascript.ruanyifeng.com/oop/basic.html#toc2

Function.prototype.call

这里紧对 Function.prototype.call 做个简单的介绍,有关更详细的介绍可以阅读 Annotated ECMAScript 5.1 语言规范里的介绍,在此之前先看看下面代码

1
2
3
4
5
6
7
8
var test = function(){
console.log('hello world')
return 'fsjohnhuang'
}
test.call() // A
Function.prototype.call(test) // B
Function.prototype.call.call(test) // C
Function.prototype.call.call(Function.prototype.call, test) // D

运行结果: A C D 控制台显示 hello world 并返回 fsjohnhuang B 返回 undefined 且不会调用 test 函数。这是怎么回事?

以下是参照规范的伪代码

1
2
3
4
5
6
7
8
9
10
11
12
13
14
15
Function.prototype.call = function(thisArg, arg1, arg2, ...) {

// this 指向调用 call 的那个对象或函数
// 如 Function.prototype.call(test) 那么这时 this 就是 Function.prototype

// 1. 调用内部的 IsCallable(this) 检查是否可调用,返回 false 则抛 TypeError
if (![[IsCallable]](this)) throw new TypeError()

// 2. 创建一个空列表
// 3. 将 arg1 及后面的入参保存到 argList 中
var argList = [].slice.call(arguments, 1)

// 4. 调用内部的[[Call]]函数
return [[Call]](this, thisArg, argList)
}

明白了这层关系之后,就比较容易的推导上面例子的运行的一个流程了。再看一下两个例子

1
2
3
var slice = Function.prototype.call.bind(Array.prototype.slice);

slice([1, 2, 3], 0, 1) // [1]
1
2
3
4
5
Array.prototype.resolve = function(){
  this.forEach(Function.prototype.call, Function.prototype.call)
}
var cbs = [function(){console.log(1)}, function(){console.log(2)}]
cbs.resolve() // 1 2

可以参考 JS魔法堂:再次认识 Function.prototype.call

instanceof 运算符深入剖析

在此之前先看看 instanceof 常规用法

1
2
3
4
5
6
7
8
9
10
11
12
function Foo(){}
var foo = new Foo();
console.log(foo instanceof Foo) // true


function Aoo(){}
function Foo(){}
Foo.prototype = new Aoo();

var foo = new Foo();
console.log(foo instanceof Foo) // true
console.log(foo instanceof Aoo) // true

instanceof 复杂用法

1
2
3
4
5
6
7
8
9
console.log(Object instanceof Object);  // true
console.log(Function instanceof Function); // true
console.log(Number instanceof Number); // false
console.log(String instanceof String); // false

console.log(Function instanceof Object); // true

console.log(Foo instanceof Function); // true
console.log(Foo instanceof Foo); // false

要理解上面代码的执行结果,需要从两个方面着手:语言规范中是如何定义这个运算符的 和 JavaScript 原型继承机制。

规范中 instanceof 运算符定义,这里给出伪代码

1
2
3
4
5
6
7
8
9
10
11
function instance_of(L, R) {  // L 表示左表达式, R 表示右表达式
var O = R.prototype; // 取 R 的显示原型
L = L.__proto__; // 取 L 的隐式原型
while (true) {
if (L === null)
return false;
if (O === L) // 这里重点:当 O 严格等于 L 时,返回 true
return true;
L = L.__proto__;
}
}

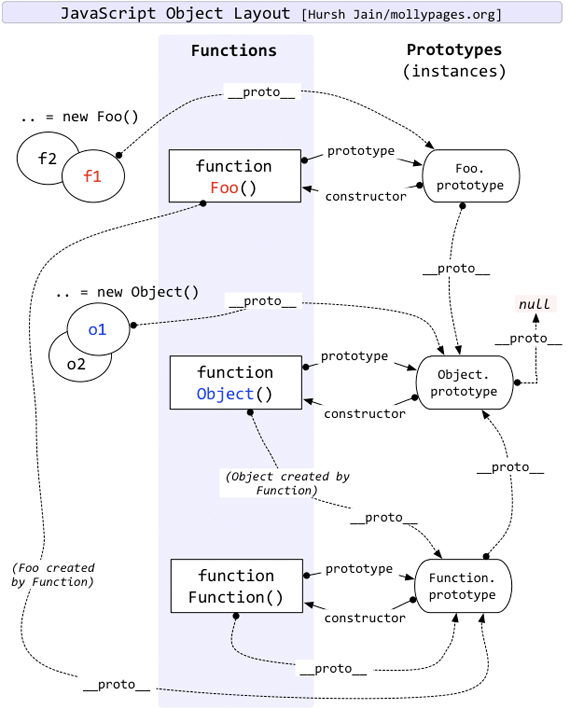
JavaScript 原型继承机制:在原型继承结构里面,规范中用 [[Prototype]] 表示对象隐式的原型,在 JavaScript 中用 proto 表示。所有 JavaScript 对象都有 __proto__ 属性,但只有 Object.prototype.__proto__ 为 null 这个属性指向它的原型对象,即构造函数的 prototype
属性。

原型继承图

下面简要分析下 console.log(Foo instanceof Foo)

1
2
3
4
5
6
7
8
9
10
11
12
13
14
15
16
17
18
19
20
21
22
23
// 为了方便表述,首先区分左侧表达式和右侧表达式
FooL = Foo, FooR = Foo;

// 下面根据规范逐步推演
O = FooR.prototype = Foo.prototype
L = FooL.__proto__ = Function.prototype

// 第一次判断
O != L

// 循环再次查找 L 是否还有 __proto__
L = Function.prototype.__proto__ = Object.prototype

// 第二次判断
O != L

// 再次循环查找 L 是否还有 __proto__
L = Object.prototype.__proto__ = null

// 第三次判断
L == null

// 返回 false

再看看下面例子的运行结果,帮助理解

1
2
3
4
Function.prototype === Function.__proto__  // true
Number.prototype === Number.__proto__ // false
Number.__proto__ === Object.__proto__ // true
String.__proto__ === Object.__proto__ // true

相关文章可查阅
JavaScript instanceof 运算符深入剖析
JavaScript 继承
从proto和prototype来深入理解JS对象和原型链

Event 对象

事件发生以后,会生成一个事件对象,作为参数传给监听函数。浏览器原生提供一个 Event 对象,所有的事件都是这个对象的实例,或者说继承了 Event.prototype 对象。

Event 对象本身就是一个构造函数,可以用来生成新的实例。

1
event = new Event(typeArg, eventInit);

Event 构造函数接受两个参数。第一个参数是字符串,表示事件的名称;第二个参数是一个对象,表示事件对象的配置。该参数可以有以下两个属性。

  • bubbles:布尔值,可选,默认为 false ,表示事件对象是否冒泡。
  • cancelable:布尔值,可选,默认为 false ,表示事件是否可以被取消。
自定义事件和事件模拟

除了浏览器预定义的那些事件,用户还可以自定义事件,然后手动触发。

1
2
3
4
5
6
7
8
// 新建事件实例
var event = new Event('build');

// 添加监听函数
elem.addEventListener('build', function (e) { ... }, false);

// 触发事件
elem.dispatchEvent(event);

上面代码触发了自定义事件,该事件会层层向上冒泡。在冒泡过程中,如果有一个元素定义了该事件的监听函数,该监听函数就会触发。

Event 构造函数只能指定事件名,不能在事件上绑定数据。如果需要在触发事件的同时,传入指定的数据,需要使用 CustomEvent 构造函数生成自定义的事件对象。

1
2
3
4
5
6
7
8
9
10
11
12
13
var myEvent = new CustomEvent("myevent", {
detail: {
foo: "bar"
},
bubbles: true,
cancelable: false
});

el.addEventListener('myevent', function(event) {
console.log('Hello ' + event.detail.foo);
});

el.dispatchEvent(myEvent);

由于 IE 不支持上述的两个 API ,如果在 IE 中自定义事件,需要其他写法,详细可阅读 阮一峰 - 自定义事件和事件模拟

注意: addEventListener 方法的第二个参数是实现 EventListener 接口的一个对象或函数,具体应用可以看 iscroll

事件的传播

当一个事件发生以后,它会在不同的 DOM 节点之间传播(propagation)。这种传播分成三个阶段:

  • 第一阶段:从 window 对象传导到目标节点,称为“捕获阶段”(capture phase)。
  • 第二阶段:在目标节点上触发,称为“目标阶段”(target phase)。
  • 第三阶段:从目标节点传导回window对象,称为“冒泡阶段”(bubbling phase)。

假设 html 结构如下

1
<div id="div"><p id="p">content</p></div>
1
2
3
4
5
6
7
8
9
10
11
12
13
14
15
16
17
18
19
20
21
22
23
24
25
26
27
28
29
30
31
32
33
34
35
36
37
38
var oDiv = document.getElementById('div');
var oP = document.getElementById('p');

var myEvent = new CustomEvent("myevent", {
detail: {
foo: "bar"
},
bubbles: true,
cancelable: false
});

var phases = {
1: 'capture',
2: 'target',
3: 'bubble'
};

var callback = function callback(event) {
var tag = event.currentTarget.tagName;
var phase = phases[event.eventPhase];
console.log("Tag: '" + tag + "'. EventPhase: '" + phase + "'");
}

oDiv.addEventListener('myevent', callback, true);
oDiv.addEventListener('myevent', callback, false);

oP.addEventListener('myevent', callback, true);
oP.addEventListener('myevent', callback, false);

// oDiv.dispatchEvent(myEvent);
oP.dispatchEvent(myEvent);


// 运行结果
// Tag: 'DIV'. EventPhase: 'capture'
// Tag: 'P'. EventPhase: 'target'
// Tag: 'DIV'. EventPhase: 'bubble'

上面代码采用自定义事件的方式,可以看出 myevent 事件被触发了四次: p 节点的捕获阶段和冒泡阶段各 1 次, div 节点的捕获阶段和冒泡阶段各 1 次。

  1. 捕获阶段:事件从 div 向 p 传播时,触发 div 的 click 事件;
  2. 目标阶段:事件从 div 到达 p 时,触发 p 的 click 事件;
  3. 目标阶段:事件离开 p 时,触发 p 的 click 事件;
  4. 冒泡阶段:事件从 p 传回 div 时,再次触发 div 的 click 事件。

注意:用户点击网页的时候,浏览器总是假定 click 事件的目标节点,就是点击位置的嵌套最深的那个节点。

事件传播的最上层对象是 window ,接着依次是 document ,html 和 body 。也就是说,如果 body 元素中有一个 div 元素,点击该元素。事件的传播顺序,在捕获阶段依次为 window、 document、 html、 body、 div ,在冒泡阶段依次为 div、 body、 html、 document、 window

这里只是简要的说明了有关事件的部分知识点,相关更多的介绍如:节点的操作,CSS 操作等 DOM 的相关知识可详细阅读 阮一峰 - DOM

PS:低版本IE不支持事件捕获

定时器

setTimeout 和 setInterval 的运行机制是,将指定的代码移出本次执行,等到下一轮 Event Loop 时,再检查是否到了指定时间。如果到了,就执行对应的代码;如果不到,就等到再下一轮 Event Loop 时重新判断。这意味着, setTimeout 指定的代码,必须等到本次执行的所有代码都执行完,才会执行。

每一轮 Event Loop 时,都会将“任务队列”中需要执行的任务,一次执行完。 setTimeout 和 setInterval 都是把任务添加到“任务队列”的尾部。因此,它们实际上要等到当前脚本的所有同步任务执行完,然后再等到本次 Event Loop 的“任务队列”的所有任务执行完,才会开始执行。由于前面的任务到底需要多少时间执行完,是不确定的,所以没有办法保证, setTimeout 和 setInterval 指定的任务,一定会按照预定时间执行。

可以运行下面例子看看:

1
2
3
4
5
6
7
8
9
10
11
12
13
14
15
16
17
18
19
20
21
22
23
24
25
26
27
28
setTimeout(function() {
console.log("Timeout");
}, 0);

function a(x) {
console.log("a() 开始运行");
b(x);
console.log("a() 结束运行");
}

function b(y) {
console.log("b() 开始运行");
console.log("传入的值为" + y);
console.log("b() 结束运行");
}

console.log("当前任务开始");
a(42);
console.log("当前任务结束");

// 当前任务开始
// a() 开始运行
// b() 开始运行
// 传入的值为42
// b() 结束运行
// a() 结束运行
// 当前任务结束
// Timeout

应用:用户在输入框输入文本转换大写英文字母,假设页面上有一元素 <input type="text" id="input-box"> 脚本如下:

1
2
3
document.getElementById('input-box').onkeypress = function(event) {
this.value = this.value.toUpperCase();
}
1
2
3
4
5
6
document.getElementById('input-box').onkeypress = function() {
var self = this;
setTimeout(function() {
self.value = self.value.toUpperCase();
}, 0);
}

可分别测试上面代码,看看异同。具体可参考阅读以下两篇文章:
阮一峰 - 浏览器的JavaScript引擎
阮一峰 - 定时器

有关于 Event Loop 的介绍可以阅读以下文章:
nodejs事件轮询详述
并发模型与Event Loop
什么是 Event Loop?
理解Node.js的event loop

JavaScript 的异步处理

JavaScript 语言的执行环境是”单线程”(single thread)。所谓”单线程”,就是指一次只能完成一件任务。如果有多个任务,就必须排队,前面一个任务完成,再执行后面一个任务。

这种模式的好处是实现起来比较简单,执行环境相对单纯;坏处是只要有一个任务耗时很长,后面的任务都必须排队等着,会拖延整个程序的执行。常见的浏览器无响应(假死),往往就是因为某一段 Javascript 代码长时间运行(比如死循环),导致整个页面卡在这个地方,其他任务无法执行。下文简要介绍在 JavaScript 中异步的处理方式。

定时器方式

利用 setTimeout 最简单的一种和常用的异步处理方式

1
2
3
setTimeout(function(){
// ...
}, 0);
回调函数
1
2
3
4
5
6
function fn(callback){
// ...
if(true){
callback();
}
}

回调函数的优点是简单、容易理解和部署,缺点是不利于代码的阅读和维护,各个部分之间高度耦合,使得程序结构混乱、流程难以追踪(尤其是回调函数嵌套的情况),而且每个任务只能指定一个回调函数。

事件监听

这种方法的优点是比较容易理解,可以绑定多个事件,每个事件可以指定多个回调函数。缺点是整个程序都要变成事件驱动型,运行流程会变得很不清晰。简单的例子就像 jQuery 绑定自定义事件然后达到一定条件后主动触发。

发布/订阅模式

该模式又叫观察者模式,它定义了对象间的一种一对多的依赖关系,以便一个对象的状态发生变化时,所有依赖于它的对象都得到通知并自动刷新。下面给出一个 pubsubz 的源码。

1
2
3
4
5
6
7
8
9
10
11
12
13
14
15
16
17
18
19
20
21
22
23
24
25
26
27
28
29
30
31
32
33
34
35
36
37
38
39
40
41
42
43
44
45
46
47
48
49
50
51
52
53
54
55
56
57
58
59
60
61
62
63
;(function ( window, doc, undef ) {

var topics = {},
subUid = -1,
pubsubz ={};

// 发布
pubsubz.publish = function ( topic, args ) {

if (!topics[topic]) {
return false;
}

setTimeout(function () {
var subscribers = topics[topic],
len = subscribers ? subscribers.length : 0;

while (len--) {
subscribers[len].func(topic, args);
}
}, 0);

return true;

};

// 订阅
pubsubz.subscribe = function ( topic, func ) {

if (!topics[topic]) {
topics[topic] = [];
}

var token = (++subUid).toString();
topics[topic].push({
token: token,
func: func
});
return token;
};

// 退订
pubsubz.unsubscribe = function ( token ) {
for (var m in topics) {
if (topics[m]) {
for (var i = 0, j = topics[m].length; i < j; i++) {
if (topics[m][i].token === token) {
topics[m].splice(i, 1);
return token;
}
}
}
}
return false;
};

getPubSubz = function(){
return pubsubz;
};

window.pubsubz = getPubSubz();

}( this, this.document ));

使用方法

1
2
3
4
5
6
7
8
9
10
11
12
13
14
15
var testSubscriber = function( topics , data ){
console.log( topics + ": " + data );
};

var testSubscription = pubsubz.subscribe( 'example1', testSubscriber );

pubsubz.publish( 'example1', 'hello world!' );
pubsubz.publish( 'example1', ['test','a','b','c'] );
pubsubz.publish( 'example1', [{'color':'blue'},{'text':'hello'}] );

setTimeout(function(){
pubsubz.unsubscribe( testSubscription );
}, 0);

pubsubz.publish( 'example1', 'hello again!' );

从源码可以看出,内部主要实现了 发布,订阅,退订 这三个方法。观察者的使用场合就是:当一个对象的改变需要同时改变其它对象,并且它不知道具体有多少对象需要改变的时候,就应该考虑使用观察者模式。有关该模式的更多介绍可以阅读 深入理解JavaScript系列(32):设计模式之观察者模式

Promise 对象

Promise 对象是 CommonJS 工作组提出的一种规范,目的是为异步操作提供统一接口。在 ECMAScript 6 之前 JavaScript 语言原生是不支持 Promise 对象的。

首先,它是一个对象,也就是说与其他 JavaScript 对象的用法,没有什么两样;其次,它起到代理作用,充当异步操作与回调函数之间的中介。它使得异步操作具备同步操作的接口,使得程序具备正常的同步运行的流程,回调函数不必再一层层嵌套。

有关更多异步处理可以参阅读下面给出的文章
阮一峰 - Promise
基于事件的 JavaScript 编程:异步与同步
jQuery.Deferred对象

JavaScript和有限状态机

有限状态机(Finite-state machine)是一个非常有用的模型,简单说,它有三个特征:

  • 状态总数(state)是有限的
  • 任一时刻,只处在一种状态之中
  • 某种条件下,会从一种状态转变(transition)到另一种状态

有关该模式的实现,可以查看 javascript-state-machine ,在某些业务场景下应用,能更好的组织代码。

相关阅读:
阮一峰 - JavaScript与有限状态机
深入理解JavaScript系列(43):设计模式之状态模式

Web Worker

http://javascript.ruanyifeng.com/htmlapi/webworker.html
https://developer.mozilla.org/zh-CN/docs/Web/API/Web_Workers_API/Using_web_workers
http://www.alloyteam.com/2015/11/deep-in-web-worker/
http://www.ibm.com/developerworks/cn/web/1112_sunch_webworker/index.html

值传递 OR 引用传递

1
2
3
4
5
6
7
8
9
10
11
12
13
14
15
function changeStuff(a, b, c) {
a = a * 10;
b.item = "changed";
c = {item: "changed"};
}

var num = 10;
var obj1 = {item: "unchanged"};
var obj2 = {item: "unchanged"};

changeStuff(num, obj1, obj2);

console.log(num);
console.log(obj1.item);
console.log(obj2.item);

If it was pure pass by value, then changing obj1.item would have no effect on the obj1 outside of the function. If it was pure pass by reference, then everything would have changed. num would be 100, and obj2.item would read changed.

Instead, the situation is that the item passed in is passed by value. But the item that is passed by value is itself a reference. Technically, this is called call-by-sharing.

In practical terms, this means that if you change the parameter itself (as with num and obj2), that won’t affect the item that was fed into the parameter. But if you change the INTERNALS of the parameter, that will propagate back up (as with obj1).

详细可阅读Is JavaScript a pass-by-reference or pass-by-value language?

Sass 之 Compass 用法指南

发表于 2016-11-03

什么是Compass

简单的说 Compass 是 Sass 的工具库,有点像 Javascript 和 JQuery 的关系。学会了 Compass 能大大提升 CSS 的开放效率。若不清楚什么是 Sass ,可移步阅读 SASS 用法指南

安装

Compass 是用 Ruby 语言开发的,所以安装它之前,必须安装 Ruby 。在命名行下输入

1
$ gem install compass

项目初始化

要创建一个你的 Compass 项目,假定它的名字叫做 testCompass,那么在命令行键入

1
$ compass create testCompass

当前目录就会生成 testCompass 的子目录。进入到该目录,你会看到一个 config.rb 文件,这是你项目的配置文件。还有两个子目录 sass 和 stylesheets 前者存放 Sass 源文件,后者存放编译后的 css 文件。

编译

要在网站上使用,必须将 scss 后缀的文件编译成 css 文件。编译命令如下

1
$ compass compile

该命令在项目根目录下运行,会将 sass 子目录中的 scss 文件,编译成 css 文件,保存在 stylesheets 子目录中。

默认状态下,编译出来的 css 文件带有大量的注释。但在生产环境需要压缩后的 css 文件,这时要使用 --output-style 参数

1
$ compass compile --output-style compressed

Compass 只编译发生变动的文件,如果你要重新编译未变动的文件,需要使用 --force 参数

1
$ compass compile --force

除了使用命令行参数,还可以在配置文件 config.rb 中指定编译模式。

1
output_style = :expanded

:expanded 模式表示编译后保留原格式,其他值还包括 :nested :compact 和 :compressed

也可以通过指定 environment 的值( :production 或 :development ),智能判断编译模式。

1
2
3
environment = :development

output_style = (environment == :production) ? :compressed : :expanded

在命令行模式下,除了一次性编译命令,compass 还有自动编译命令

1
$ compass watch

运行该命令后,只要 scss 文件发生变化,就会被自动编译成 css 文件。按 Ctrl + C 退出监听。

有官更多 compass 的用法,请到官网查阅

注意:在 sass 目录下 若文件以 _ 开头,如 _mixin.scss, _variables.scss, _icons.scss 则编译时不会生成 css 文件到 stylesheets 目录。这特性可结合 @import 使用。

使用

Compass 采用模块结构,不同模块提供不同的功能。如 reset, css3, layout, typography, utilities 这些模块。具体怎么用,可参考官方文档

下面给出一个示例代码,简单展示下 Compass 的用法

1
2
3
4
5
6
7
8
9
10
11
12
13
14
15
16
17
18
19
20
21
22
23
24
25
26
27
28
29
30
31
32
33
34
35
36
37
38
39
40
41
42
43
44
45
46
47
48
49
50
51
52
53
54
55
56
57
58
59
60
61
62
63
64
65
66
67
68
69
70
71
72
73
74
75
76
77
78
79
80
81
82
83
84
85
86
87
88
89
90
91
92
93
94
95
96
97
98
99
100
101
102
103
104
105
106
107
108
109
110
111
112
113
114
115
116
117
118
119
120
//引入 compass 也可指定引入某模块如  @import "compass/reset";
@import "compass";


// normalize 是第三方模块 使用前需要安装好,并在 config.rb 文件中 添加 require "compass-normalize"
//@import "normalize";


//浏览器的支持情况
//@debug browsers();
//@debug browser-versions(ie);
//$supported-browsers : chrome;
//$browser-minimum-versions:("ie":"8");
//@debug omitted-usage('ie', '6'); //0.0093 使用率

@include establish-baseline();

body{
@include debug-vertical-alignment;
}

//自动添加浏览器的前缀
.radius{
@include border-radius(4px);
}

.transparent{
@include opacity(0.5);
}

.inline-block{
@include inline-block;
}

a{
@include link-colors(#000, #0cc, #0ca, #c0a, #fa0);
@include unstyled-link();
}

//强行换行
.force-wrap{
@include force-wrap();
}

.nowrap{
@include nowrap;
}

//不换行 长度超出变成 ...
.ellipsis{
@include ellipsis;
}

//若只兼容 ie8 以上 则编译后的 css 不出现 display: inline; (双边距)
.left{
@include float('left');
}

.article{
h1,h2,h3,p{
margin:0;
}
h1{
//font-size:3em; //48 / 16 = 3
//line-height: 1.5em; // 72 / 48 = 1.5
@include adjust-font-size-to(48px);
}
h2{
//font-size:2.25em; //36 / 16 = 2.25
//line-height: 1.333333em; // 48 / 36 = 1.333333
@include adjust-font-size-to(36px);
}
h3{
//font-size:1.5em; //24 / 16 = 1.5
//line-height: 2em; // 48 / 24 = 2
@include adjust-font-size-to(24px);
}
p{
// font-size:1em;
// line-height: 1.5em;
@include adjust-font-size-to(16px);
@include leader();
@include trailer();
}
}

//base64
.img1{
background-image: inline-image("2.jpeg");
}

.img2{
background-image: image-url("0.jpg");
}

.tableStyle{

//外边框
@include outer-table-borders(2px, #f60);

//单元格边框
@include inner-table-borders(1px, #000);

//格式化
@include table-scaffolding;

@include alternating-rows-and-columns(#fff, #f90, #222);
}

//清楚浮动
.clearfix{
@include legacy-pie-clearfix();
}

.minH{
@include min-height(30px);
}

//精灵图
@import 'icons';

其中 _icons.scss 的代码如下

1
2
3
4
5
6
7
8
9
10
11
12
13
14
15
16
17
18
19
20
21
//为 true 则样式中加上图片宽高
$icons-sprite-dimensions : true;

//合成布局 水平(horizontal) 垂直 对角线(diagon) 最节省空格 smart
$icons-layout : horizontal;

//间隔
$icons-spacing : 30px;

//更多参数参考 http://compass-style.org/help/tutorials/spriting/customization-options/

@import "icons/*.png";

@include all-icons-sprites();

//这样使类名 main-logo 有 s03 的样式
.main-logo{
@include icons-sprite('s03');
}

//也可以生成带伪类的样式 图片命名 如 a.png 和 a_hover.png

结语

通过 sass 和 less 等这种 css 预处理器,可以让我们更高效多书写样式。另外要提一下的就是 postcss 相关介绍和教程可跳阅读 http://www.w3cplus.com/blog/tags/516.html

相关阅读

  • 阮一峰 - Compass 用法指南

SASS 用法指南

发表于 2016-11-02

什么是 SASS

SASS 是一种 CSS 开发工具,提供了许多便利的写法,使得 CSS 编写变得简单和可维护。本文总结了 SASS 的常用用法,高手可略过,也可参考官方文档

安装

使用 SASS 需要安装 Ruby ,Windows 用户可在这 下载 Ruby 的安装包。假定你已经安装好了 Ruby ,接着在命令行输入下面的命令进行安装。

1
$ gem install sass

可以通过 sass -v 来检测 SASS 是否安装成功。

由于国内网络原因,导致 rubygems.org 存放在 Amazon S3 上面的资源文件间歇性连接失败。这时我们可以利用淘宝提供的 RubyGems 镜像 ,在命令行输入下面命令。

1
2
3
4
5
$ gem sources --add https://ruby.taobao.org/ --remove https://rubygems.org/
$ gem sources -l
*** CURRENT SOURCES ***

https://ruby.taobao.org

若切换淘宝提供的镜像是提示 SSL certificate verify failed 相关的信息,那需要进一步的设置。下面是简单描述:

  1. 到 https://curl.haxx.se/ca/cacert.pem 下载证书,一般放到 Ruby 安装的根目录即可。
  2. 设置环境变量,变量名为 SSL_CERT_FILE 值为证书地址。如:D:\Program Files\Ruby23-x64\cacert.pem
  3. 重启客户端,再重新设置
  4. 可参考 https://gist.github.com/fnichol/867550 和 http://www.csdn123.com/html/topnews201408/35/3635.htm

另外提醒一下 npm 也存在同样的情况,也可换成 淘宝 NPM 镜像

1
2
$ npm config set registry https://registry.npm.taobao.org
$ npm config get registry

使用

SASS 文件是普通的文本文件,文件后缀名是 .scss ,我们需要将其编译成 *.css 的文件来使用,命令如下。

1
2
$ sass test.scss test.css
$ sass --style compressed test.sass test.css

SASS 提供四个编译风格的选项

1
2
3
4
5
6
7
1. nested:嵌套缩进的css代码,它是默认值。

2. expanded:没有缩进的、扩展的css代码。

3. compact:简洁格式的css代码。

4. compressed:压缩后的css代码。

你也可以让 SASS 监听某个文件或目录,一旦源文件有变动,就自动生成编译后的版本。

1
2
3
$ sass --watch input.scss:output.css  // watch a file

$ sass --watch app/sass:public/stylesheets // watch a directory

按 Ctrl + C 可停止监听,另外还有一个在线转换器,你可以在那里,试运行下面的例子。

基本用法

1.注释

SASS 共有两种注释风格

  • 标准的 CSS 注释 /* comment */ ,会保留到编译后的文件。
  • 单行注释 // comment ,只保留在 SASS 源文件中,编译后被省略。

在 /* 后面加一个感叹号,表示这是”重要注释”。即使是压缩模式编译,也会保留这行注释,通常可以用于声明版权信息。

1
2
3
/*!
重要注释!
*/

2.变量

SASS 允许使用变量,所有变量以 $ 开头。如果变量需要镶嵌在字符串之中,就必须需要写在 #{} 之中。

1
2
3
4
5
6
7
8
9
10
$blue : #1875e7;
$side : left;

div {
color : $blue;
}

.rounded {
border-#{$side}-radius: 5px;
}

3.计算功能

1
2
3
4
5
body {
 margin: (14px/2);
 top: 50px + 100px;
 right: 2 * 10%;
}

4.嵌套

1
2
3
4
5
div {
h1 {
color:red;
}
}

属性也可以嵌套

1
2
3
4
5
6
7
p {
border:{
width:1px;
color:#f90;
style:solid;
}
}

在嵌套的代码块内,可以使用 & 引用父元素

1
2
3
4
5
6
a {
color:#000;
&:hover {
color: green;
}
}

5.继承

1
2
3
4
5
6
7
8
9
.class1{
width: 100px;
height:100px;
}

.class2{
@extend .class1;
background-color: #fa0;
}

上面示例编译后

1
2
3
4
5
6
7
8
.class1, .class2 {
width: 100px;
height: 100px;
}

.class2 {
background-color: #fa0;
}

6.Mixin

1
2
3
4
5
6
7
8
9
@mixin rounded($vert, $horz, $radius:10px) {
    border-#{$vert}-#{$horz}-radius: $radius;
    -moz-border-radius-#{$vert}#{$horz}: $radius;
    -webkit-border-#{$vert}-#{$horz}-radius: $radius;
}

div {
@include rounded(top, left, 5px);
}

7.插入文件

@import 命令,用来插入外部文件。如果插入的是 .css 文件,则等同于 css 的 import 命令。

1
@import '*.scss';

8.自定义函数

1
2
3
4
5
6
7
@function double($n){
@return $n * 2;
}

.testDouble{
width:double(100px);
}

结语

更多特性可自行查看 SASS 官网,和 SASS 类似的有 LESS ,可百度了解。另外还有一个强悍的 SASS 工具库 Compass

相关阅读

  • 阮一峰 - SASS用法指南
  • sass 入门
  • sass 中文网
  • sass 中文文档
12
avilang

avilang

爱折腾,爱分享,爱学习

17 日志
GitHub
© 2024 avilang
由 Hexo 强力驱动
主题 - NexT.Mist